Backups, migrations, and upgrades
Create complete Cove backups, upgrade native or Docker installs, restore safely, and verify recovery.
Know what each backup contains
A recoverable Cove backup has more than one part. Keep at least one copy outside the machine or storage pool that runs Cove.
| Part | What it preserves | What it does not preserve |
|---|---|---|
| Backup Database | Library metadata and relationships, users, roles, permissions, saved state, history, and database-backed extension data | Config files, installed extension files, generated assets, and source media |
| Backup Config | cove-config.json, including library paths and server settings | The database, installed extension files, generated assets, and source media |
| Config/home directory copy | Config, installed extensions, logs, and other files stored under the instance home | The database when PostgreSQL is stored elsewhere |
| Generated directory copy | Covers, thumbnails, previews, sprites, and other derived assets | Source media and database records; generated assets can usually be rebuilt |
Create a backup in Cove
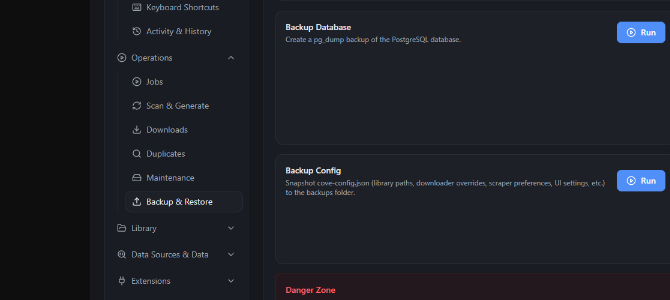
- Let write-heavy scans, imports, downloads, and extension jobs finish.
- Open Settings → Operations → Backup & Restore.
- Select Run on Backup Database. Record the returned cove_backup_<timestamp>_manual.sql path and confirm the file is non-empty.
- Select Run on Backup Config. Record the returned cove_config_<timestamp>_manual.json path.
- Copy both files off the Cove host. For immediately usable extensions and generated assets, also make a consistent copy or storage snapshot of the instance config/home and generated directories.
Where backups are written
- Provided Docker compose files: Cove writes to /backups; the default host path is ${COVE_DATA_DIR}/backups. Logs and installed extensions are under ${COVE_DATA_DIR}/config, and generated assets are under ${COVE_DATA_DIR}/generated.
- Native app: backups default to backups under that instance's home directory. Cove Instance Manager keeps each instance home separate.
- Source run: backups default to $COVE_HOME/backups when COVE_HOME is set; otherwise they use the platform-local Cove data directory.
Upgrade Docker
Keep the compose file and the same COVE_DATA_DIR value you used to create the deployment.
- Read the release notes and check for version-specific instructions.
- Create and copy out the database and config backups above.
- Pull the new image, recreate the service, confirm its status, and review recent logs with the commands below. Use docker-compose.yml instead when that is your deployment's compose file.
- If Cove shows Database Update Required, review the pending migrations and select Run Migration once. Cove creates one pre-migration database backup and applies the complete pending sequence before opening the library.
- Keep the old backups until the upgraded instance passes verification.
COVE_DATA_DIR=/srv/cove docker compose --file docker-compose.allinone.yml pull
COVE_DATA_DIR=/srv/cove docker compose --file docker-compose.allinone.yml up --detach
COVE_DATA_DIR=/srv/cove docker compose --file docker-compose.allinone.yml ps
COVE_DATA_DIR=/srv/cove docker compose --file docker-compose.allinone.yml logs --tail 100 coveUpgrade the native app
- Read the release notes and create both built-in backups.
- Stop the instance with Cove Instance Manager.
- Install the new package from the latest release.
- Start the same instance. If Cove shows Database Update Required, review the pending migrations and select Run Migration once. Cove backs up the database and applies the complete pending sequence before opening the library.
- Verify the instance before deleting the previous installer or backup.
Restore an existing installation
- Put the backup files somewhere the Cove server can read. With the provided Docker setup, copy them into ${COVE_DATA_DIR}/backups on the host and refer to them as /backups/<filename> in Cove.
- Open Settings → Operations → Backup & Restore.
- Under Restore Backup, enter the database backup path, acknowledge that the current database will be replaced, and select Run.
- Cove creates a pre-restore database backup, replaces the database, and reloads.
- If needed, restore the config snapshot under Restore Config. Cove makes a pre-restore config snapshot before replacing cove-config.json, then reloads.
- Restore saved config/home and generated-directory files when they were part of the recovery plan, preserving ownership and permissions compatible with the Cove process.
On a brand-new instance, the first-run wizard also offers Restore Cove Backup. It accepts a database backup and an optional config backup, then continues through owner setup.
Verify an upgrade or restore
- Confirm login, user roles, and expected access rules.
- Open representative library items and play media.
- Run a small selective scan and confirm it completes.
- Test search, saved filters, and expected metadata relationships.
- Check generated covers or previews and one important extension.
- Open Settings → Operations → Jobs and Settings → System Info → Logs for failures.
Keep the pre-upgrade and pre-restore backups until login, scan, search, generated media, and important extensions have all worked in normal use.